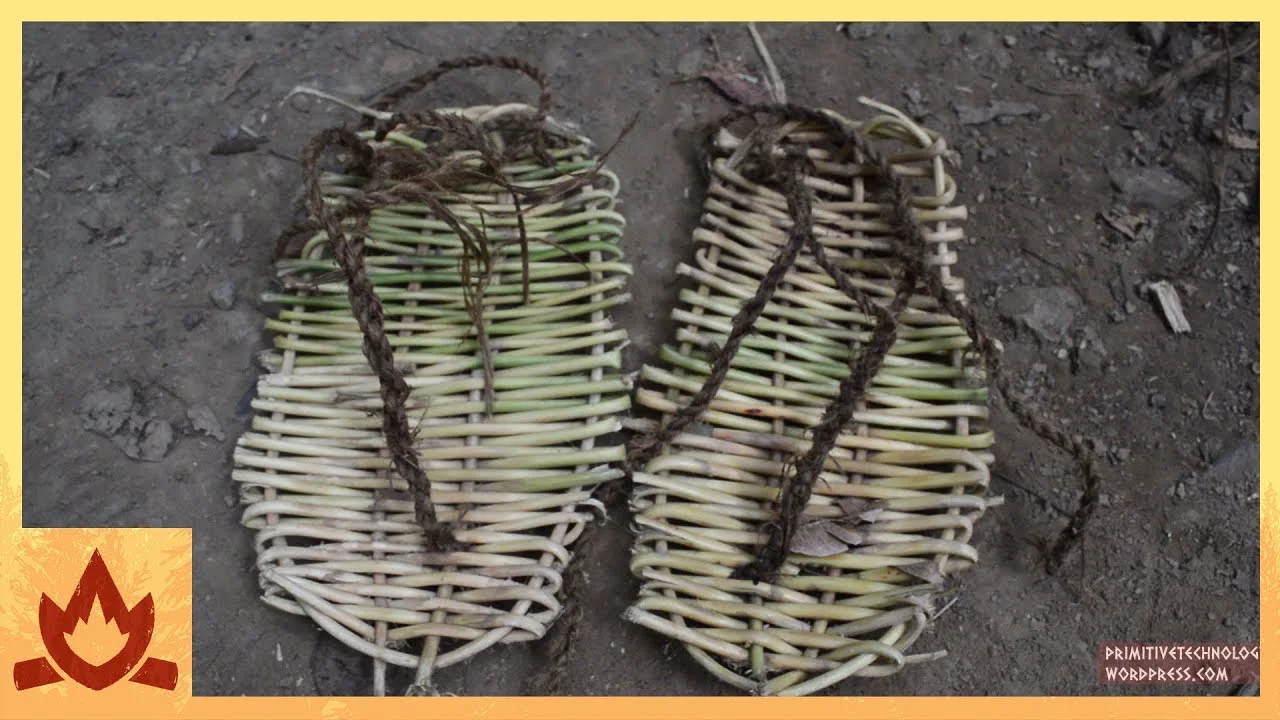
I made a pair of sandals from loya cane. Walking bare footed in the bush generally doesn't cause problems for my feet. But when repetitively carrying loads of various materials the soles of the feet become cracked and split. So I made some basic footwear for the purpose of working on rough surfaces. I cut some cane and measured out a length 6 times the length of the foot (about 1.5 m), folded it into loops and wove more cane between the loops to form the sole, adding new cane as needed. Next, I made bark fiber cordage and threaded it through the sandal to keep it on. The pair took about 1 hour to make (longer due to setting up the camera). The sandals do protect from the ground, preventing the feet from cracking. I personally don't like wearing footwear in the forest as bare feet give better grip, especially on inclines. But for heavy work or when my feet are injured I'll wear these. These sandals are so quick to make that I've already got 2 pairs. The material used to make them (loya cane) is everywhere here but pretty much any rope like material will do. Bark fiber rope, grass, vine, flexible roots etc. will all make usable alternative materials. Wordpress: https://primitivetechnology.wordpress.com/ Patreon page: https://www.patreon.com/user?u=2945881 I have no face book page, instagram, twitter etc. Beware of fake pages.
Published on 23 May 2015
The manufacture of a stone ax including the handle from using only primitive tools and materials. It is a celt (pronounced "selt") a type of ax with a polished stone head wedged into a hole or mortise at the end of a wooden handle (not to be confused with a "Kelt" referring to a Celtic person). The head took about a week and a day to make as I chose to make it from a particularly large piece of basalt. The hammer stone used to shape the basalt was of quartz. This involved hammering, pecking, grinding and polishing the head into the final shape. The handle took a day and a morning to make. A chisel was made from stone and a mallet made from a log. These were used to cut the tree for the handle and shape it once down. Fire was used to harden the wood and also to help shape the mortise. The ax was then used to cut down a tree the day after the handle was a tree itself. It is a more efficient tool for felling trees than the hand ax I made and at the time of uploading this video has cut down 4 trees which I will use later. Because this stone axe is blunter than a steel one, the blade needs to hit the tree at angles greater than 45 degrees- otherwise the blade would glance off. So celts were used more like wedges than modern axes. Wordpress: https://primitivetechnology.wordpress.com/ Patreon page: https://www.patreon.com/user?u=2945881&ty=h I have no face book page. Beware of fake pages.
Published on 24 Mar 2016
I made this bow and arrow using only primitive tools and materials.The bow is 1.25 m (55 inches) long and shoots 60 cm (2 feet) long arrows. I don't know the draw weight - safe to say greater than 15 kg (35 pounds) perhaps? The stave was made from a tree ,Northern Olive (Chionanthus ramiflora), that was cut with a stone axe and split in half with a stone chisel. One half was used for the bow and was cut to a length of 1.25 m (50 inches). The limbs of the bow were carved with various stone blades so that the limbs tapered in width, and to a lesser extent depth, towards the tips. The middle of the bow was narrowed in width to form a handle about 12.5 cm (5 inches) long. The string was made from the inner bark of a fibrous tree. It was separated into thin strips and left to dry. Then it was twisted into cordage. Arrows were made of the same wood as the bow and were 60 cm (2 feet) long. A notch was carved into the back to accept the bow string. They were fletched with bush turkey feathers picked up from the ground (no turkeys were harmed in the making of this video). A feather was split in half and cut into 3 lengths then resin and bark fiber attached the fletching on to the arrows. The tip of the arrow was fire hardened and sharpened to a point. The fletching was trimmed using a hot coal. Each arrow took about an hour to make. A quiver was made of bark to hold the arrows. Importantly, the quiver was worn on the back in the historically accurate style of native American and African archers- not on the hip like medieval European archers (see back quiver: https://en.wikipedia.org/wiki/Quiver ). I cleared a shooting range with a semi rotten log as a target instead of a hay bale. At 10 meters the accuracy was better than 50 % for this narrow target and the arrows stuck into the wood enough so that they were difficult to pull out. The bow was durable, shooting about 200-300 times with the string breaking only 3 times. I made a back up string and repaired them by splicing the ends back together. In conclusion this was an easy bow to make. The short design makes it easy to find a straight piece of wood for the stave. A short string is also easy to make and short arrow shafts are easy to find. Short bows shoot fast and are easy to carry in thick forest. The dimensions of the bow were based on those given in the SAS Survival Handbook by john Lofty Wiseman. but instead of carving it from a stave from the start, I split the stave and then carved it. I think this requires less time, effort and skill. It also gives a flat bow design that's unlikely to break. It does require wood that doesn't twist much when split though. Wordpress: https://primitivetechnology.wordpress.com/ Patreon page: https://www.patreon.com/user?u=2945881&ty=h I have no face book page. Beware of fake pages.
Published on 27 Jun 2015
The video shows the construction and use of a stone adze.To put this video in context, the dome hut you see in the video is in the same spot as the wattle and Daub hut is today- only 2 years earlier (first started filming these builds). I shaped the head from basalt using a hammer stone to roughly shape it (pecking) and a grind stone to polish it (grinding). I used an L shaped piece of wood to form the handle, carving a backrest to absorb the shock of each strike and lashed the stone to the handle using lawyer cane. I then cut down two trees and a sapling to demonstrate the time taken to use it (note-this land is an abandoned cane farm and not virgin forest). I would say that a stone adze is easier to make than a celt ax and is also quite effective at felling trees. The stone adze was the all purpose wood working tool in Papua New Guinea and favored over axes by most canoe building cultures. Later I discarded the adze, demolished the dome and built the wattle and daub hut without any previous technology I made- just to see if I could. Wordpress: https://primitivetechnology.wordpress.com/ Patreon page: https://www.patreon.com/user?u=2945881&ty=h I have no face book page. Beware of fake pages.
Published on 29 Apr 2017
I built a water powered hammer called a “Monjolo” (see also karausu (からうす) on google images). I started by making a water spout from half a hollow log to direct water from the creek. This was set up in the creek and water flowed through it. The hammer was made from a fallen tree. I cut it to size by burning it at the points I wanted it cut (to save effort chopping). Next I carved a trough in one end to catch falling water. This was done first with a stone chisel that was then hafted to an L–shaped handle and used as an adze. This adze only took about an hour to make as I already had the chisel head and cordage made of bark fibre to bind it with. To save further effort carving I used hot coals from the fire to char the wood in the trough. I put the coals in using “chopsticks” (unused arrow shafts) to transfer them from the pit. The coals were fanned or blown with a wooden blowpipe till the wood in the trough burned. Then the char was scraped out. The sides of the trough were sealed with clay to make sure the wooden sides did not burn away which would effectively decrease the volume of the trough. This was approximately 8 hours work over two days. With the trough carved I made a hole in the middle of the log as a pivot point. Using the same char and scrape method I burnt a hole right through the log using hot coals and a blow pipe. Again clay was used to prevent wood burning where it was wanted. To burn through the approximately 25 cm diameter log it took about 4 hours and 30 minutes. Another hole was burnt in the end to fit the wooden hammer head and it took a similar amount of time. A tripod lashed with loya cane was set up at the water spout. The axel of the hammer was tied to one leg, the hammer fitted onto the axel and the other end of the axel tied to another leg. The trough was positioned under the waterspout to collect water and the tripod adjusted so that the resting point of the hammer was horizontal (so water wouldn’t prematurely spill out of the trough). The trough filled with water, outweighed the hammer head and tilted the hammer up into the air. The water then emptied out of the trough (now slanting downwards) and the hammer then slammed down onto an anvil stone returning to its original position. The cycle then repeated at the approximate rate of one strike every 10 seconds. The hammer crushes small soft types of stone like sandstone or ochre. I carved a bowl into the anvil stone so that it would collect the powder. I then crushed old pottery (useful as grog for new pots) and charcoal. Practically speaking, this hammer worked ok as a proof of concept but I might adjust it or make a new one with a larger trough and bigger hammer for heavy duty work. This is the first machine I’ve built using primitive technology that produces work without human effort. Falling water replaces human calories to perform a repetitive task. A permanent set up usually has a shed protecting the hammer and materials from the weather while the trough end sits outside under the spout. This type of hammer is used to pulverise grain into flour and I thought I might use one to mill dry cassava chips into flour when the garden matures. This device has also been used to crush clay for porcelain production. A stone head might make it useful as a stamp mill for crushing ores to powder. It might pulp fibres for paper even. Wordpress: https://primitivetechnology.wordpress.com/ Patreon page: https://www.patreon.com/user?u=2945881&ty=h I have no face book page, instagram, twitter etc. Beware of fake pages.
Published on 21 May 2016
I built a fenced enclosure and cultivated sweet potatoes (from civilisation) and yams (from the wild) in it. I originally had a small 3X3 m garden behind the wattle and daub hut that already had some sweet potato and yam vines growing in it that were planted after the hut was built. But wallabies kept eating the leaves. So I made a wattle enclosure around it to keep them out. Wood ash was added to the soil to provide potassium and phosphorus for the growing tubers. The previous small garden was organised in rows (not seen in this video) but this was hard to water during dry weather. So I re-organised the patch into 1 meter wide mounds with pits in the centre. Vines were planted into the mounds and water poured into the centre of each mound watered the vines. So then I had a small garden with 9 mounds contained within it. I decided to enlarge the patch to fit in more mounds so I took out 2 sides of the fence and extended them by a meter each. So the patch ended up being 4X4m and contained 16 mounds. In addition to wood ash, leaf mould was added to the mounds for fertility and to reduce loss of moisture. The patch, being in the dark forest understory, received only about 2-3 hours of direct sunlight per day so the yield was disappointingly small. Nevertheless, the patch produced a few small sweet potatoes and a single larger yam. I also picked some green growing tips of the sweet potato vine that can also be eaten. I boiled the greens slightly in a pot with a hot stone and ate the leaves. I then roasted the sweet potatoes and yam in the coals of the fire. The sweet potatoes (purple fleshed tuber) taste sweet and starchy whereas the yam (white fleshed tuber) tastes similar to an ordinary potato. After eating, I took the wood ash from the fire and poured it back into the mounds that were harvested, replanted them and watered them. In future I’d plant the sweet potatoes in an area that receives much more sunlight in order to dramatically increase production. I’ve grown the same variety at home and it produces a much greater quantity and size of tubers in full sun. Wood ash also tends to increase tuber yield and so is a good use for waste ash. The sweet potato is a remarkable plant. It’s a staple food of many traditional cultures. NASA has considered it a potential crop to be grown on spaceships for long term missions. In terms of energy production it’s only 3rd behind sugar cane and cassava. It produces the most food value (a combination of edible energy and nutrition) of any crop per unit space and time. A study of Fijian farms using manual labour showed that ratio of energy put into farming vs yield of energy was 1:17 for rice and 1:60 for sweet potato. It grows on marginal soil and doesn’t require much nitrogen to grow. It takes a relatively short growth period of 3-4 months to yield. All parts of the plant can be eaten including the leaves which provide additional protein and nutrients. I grow the purple variety (because it tastes better in my opinion) but all varieties are nutritious and will stave off malnutrition. A person could potentially be nearly self-sufficient from a small plot of sweet potatoes. Note that in colder climates, regular potatoes could be grown instead of sweet potatoes. Wordpress: https://primitivetechnology.wordpress.com/ Patreon page: https://www.patreon.com/user?u=2945881&ty=h I have no face book page. Beware of fake pages.
Published on 2 May 2015
I built this hut in the bush using naturally occurring materials and primitive tools. The hut is 2m wide and 2m long, the side walls are 1m high and the ridge line (highest point) is 2m high giving a roof angle of 45 degrees. A bed was built inside and it takes up a little less than half the hut. The tools used were a stone hand axe to chop wood, fire sticks to make fire, a digging stick for digging and clay pots to carry water. The materials used in the hut were wood for the frame, vine and lawyer cane for lashings and mud for walls. Broad leaves were initially used as thatch which worked well for about four months before starting to rot. The roof was then covered with sheets of paper bark which proved to be a better roofing material (*peeling the outer layer of bark does not kill this species of tree). An external fireplace and chimney were also built to reduce smoke inside. The hut is a small yet comfortable shelter and provides room to store tools and materials out of the weather. The whole hut took 9 months from start to finish. But it only took 30 days of actual work (I abandoned it for a few months before adding bark roof, chimney and extra daub ). Wordpress: https://primitivetechnology.wordpress.com/ Patreon page: https://www.patreon.com/user?u=2945881&ty=h I have no face book page. Beware of fake pages.
Published on 23 Sep 2017
(Turn on captions [CC] in the lower right corner for more information while viewing.) I made a brick mold that makes bricks 25 x 12.5 x 7.5 cm from wood. A log was split and mortise and tenon joints were carved using a stone chisel and sharp rocks. The mold was lashed together with cane to prevent it from coming apart when used. Next, I made a mixture of mud and palm fiber to make the bricks. This was then placed into the mold to be shaped and taken to a drying area. 140 bricks were made. When dry, the bricks were then assembled into a kiln. 32 roof tiles were then made of mud and fired in the kiln. It only took 3 hours to fire the tiles sufficiently. The mud bricks and tiles were a bit weaker than objects made from my regular clay source because of the silt, sand and gravel content of the soil. Because of this, I will look at refining mud into clay in future projects instead of just using mud. Interestingly, the kiln got hot enough so that iron oxide containing stones began to melt out of the tiles. This is not metallic iron, but only slag (iron oxide and silica) and the temperature was probably not very high, but only enough to slowly melt or soften the stones when heated for 3 hours. The kiln performed as well as the monolithic ones I've built in the past and has a good volume. It can also be taken down and transported to other areas. But the bricks are very brittle and next time I'd use better clay devoid of sand/silt, and use grog instead of temper made of plant fiber which burns out in firing. The mold works satisfactorily. I aim to make better quality bricks for use in furnaces and buildings in future. Wordpress: https://primitivetechnology.wordpress.com Patreon page: https://www.patreon.com/user?u=2945881 I have no face book page, instagram, twitter etc. Beware of fake pages.
Published on 9 May 2015
I built this thatched dome hut on a mountain ridge using completely primitive tools and materials. The frame was 2.5 m in diameter and 2 m tall. It was made from 8 thin saplings 2.75 m long, the thatching material was split palm fronds and vine was used for tying it all together. A stone hand ax was used to chop the saplings and a sharp stone flake was used to cut fronds. The pointed dome profile is half way between a spherical dome and a ti-pi. This shape sheds rain and funnels smoke effectively while still providing a large inner volume. A moat was dug around the hut to drain water away. As an afterthought I planted sweet potatoes and taro around the moat to hopefully provide some food later on. Wordpress: https://primitivetechnology.wordpress.com/ Patreon page: https://www.patreon.com/user?u=2945881&ty=h I have no face book page. Beware of fake pages.
Published on 10 Aug 2019
Join me for my first Reddit AMA on Friday 1st November 9am BST / 6pm AEST. My username is u/JohnPlant. The AMA will be on the “r/IAmA” subreddit. Primitive Technology: My hut burned down, so I built new one - Building a hut from scratch. Get my new book: http://po.st/PrimTechBook| Subscribe: http://bit.ly/subPT Me building the hut, before it burned down: https://youtube.com/watch?v=Ka2Eu6LxAKo&list=PLGnWLXjIDnpBBsdKZb-vy30o88SIxItp2 Follow Primitive Technology: Wordpress: https://primitivetechnology.wordpress.com/ Patreon: https://patreon.com/user?u=2945881 Watch More Primitive Technology: Latest Uploads: https://youtube.com/playlist?list=PLGnWLXjIDnpBR4xqf3FO-xFFwE-ucq4Fj&playnext=1 Pyrotechnology: https://youtube.com/playlist?list=PLGnWLXjIDnpBVRqu5lz5JGaQxjPs7q3CJ&playnext=1 Shelter: https://youtube.com/playlist?list=PLGnWLXjIDnpBBsdKZb-vy30o88SIxItp2&playnext=1 Weapons: https://youtube.com/playlist?list=PLGnWLXjIDnpA-XGDrrmVgBnSXx15i2Awp&playnext=1 Popular Videos: https://youtube.com/playlist?list=PLGnWLXjIDnpAb29Lrdki5BPjTpMon8zla&playnext=1 About This Video: My hut burned down after I left a fire untended in it. I needed a new one quickly. Fortunately I had already cleared a new spot earlier in the wet season for such a purpose. I constructed the new hut from wood and palm thatch. It was 3 x 3m in floor plan and a total of 3m high with 1.5m high side walls. 4 posts were put into the ground and a pyramidal roof was built on top of this. The frame was then thatched with palm fronds (which are less flammable than grass thatch but don't tend to last as long in wet weather). After finishing the hut I collected the possessions from the last hut and moved them into the new one. Yams from the garden were dug up but there weren't many due to the soil being compacted and low in organic matter. A yam was cooked by wrapping it in clay and baking it in the hot coals for 30 minutes. Now I have a larger hut where I can continue to make projects despite the minor set back that has just occurred. About Primitive Technology: Primitive technology is a hobby where you build things in the wild completely from scratch using no modern tools or materials. These are the strict rules: If you want a fire, use a fire stick - An axe, pick up a stone and shape it - A hut, build one from trees, mud, rocks etc. The challenge is seeing how far you can go without utilizing modern technology. I do not live in the wild, but enjoy building shelter, tools, and more, only utilizing natural materials. To find specific videos, visit my playlist tab for building videos focused on pyrotechnology, shelter, weapons, food & agriculture, tools & machines, and weaving & fiber.